DIY: headboard with pallets, creative crib and cardboard lamp
Three bloggers teach how to make decorations upcycle at home without needing much

Being green is in fashion and, when we talk about fashion, we also talk about decoration. The problem is that being green is sometimes expensive. But fear not! We've put together three examples of cheap and easy decorations reusing things you probably have around the house. Check out!
Bed head with pallets

Blogger Cathey Withane loves pallets! For those who don't know, pallets are storage and distribution packaging. In Brazil, they are widely used in fairs and constructions to move goods.
And because Cathey is in love with them, whenever she sees someone throwing them away in the street, she takes them home to reuse them. A pallet can be transformed into various objects such as a bookcase, a shoe shelf or, in this particular case, even a headboard.
Cathey anchored pieces of wood to the wall and screwed the pallet into them so it would be safe to sleep under the headboard. The blogger used decorative vinyl stickers to make the headboard more ornate.
But be careful
If you are going to rescue pallets from the street, be aware that the pallets undergo a phytosanitary treatment process to eliminate pre-existing pests in the wood and reduce the risk of contamination. The phytosanitary process can be done through heat treatment or fumigation. On each pallet there is a stamp marked in black paint on the corner of the wood with a code that indicates whether the wood has been treated with a chemical process (MB) or with a thermal process (HT).
This is important information because, if the pallet has gone through the chemical process, it is not safe to use due to the presence of methyl bromide, which according to the United Nations Environmental Program (UNEP) is an extremely toxic and harmful product human.
Cradle for creativity

the blog A Little Learning for Two is run by a Canadian supermom who has a thousand and one incredible ideas up her sleeve. She publishes from creative crafts to recreational games with objects that you have at home. One of these creations was the upcycle of a crib on an activity table! It's super easy to make and perfect for reusing that crib that's been kept for years in your home.
You will need:
- A crib with a removable side;
- A mattress-size MDF board;
- Blackboard ink.
Cut two MDF planks to fit snugly into the mattress. The wooden boards can be painted with blackboard paint, which can be made at home (see video) or purchased.
Then, just use your imagination to decorate your table even more. The creator chose to use the hooks and suction cups to hang cases, storage boxes or tools such as scissors. The rails at the end of the crib were used to hang a whiteboard, and small pots to hold sticks of chalk and crayons.
To learn how to make chalkboard paint, check out the video.cardboard lamp
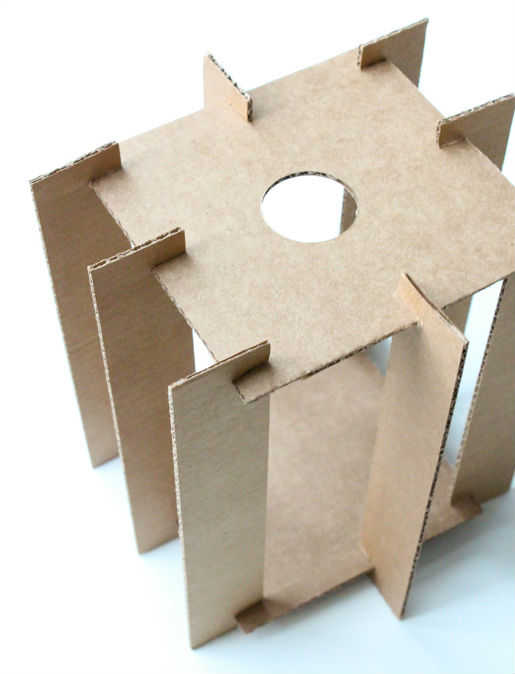
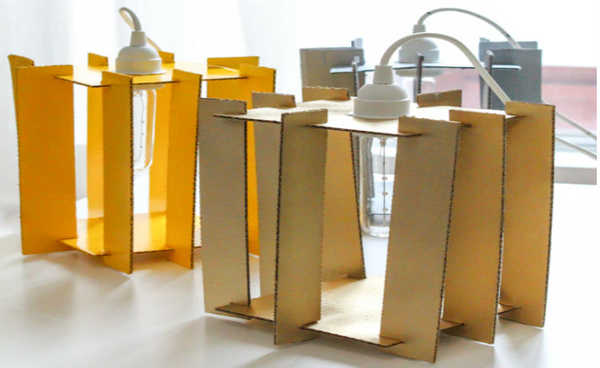
Ashley Rose created the blog Sugar and Cloth as a project for family and friends while taking a two-year break from college. In it, she teaches different "do it yourself" projects. One of them is this super easy-to-make cardboard lamp.
You will need:
- 1 medium cardboard box;
- Scissors and a knife;
- Ruler;
- Pencil;
- 25 Watt lamp (so there is no fire hazard);
- One pendant light kit;
- Spray paint and electrical tape (optional - for decorative use only).
Step by step
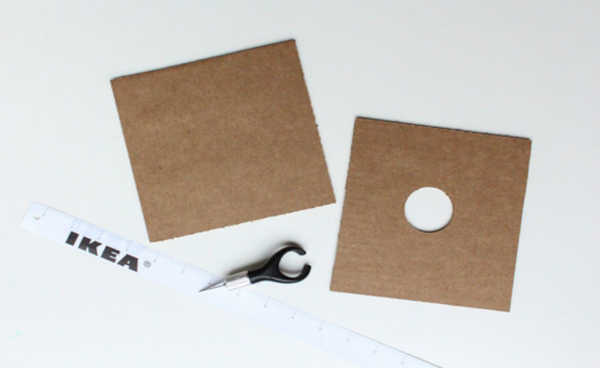
- Take the cardboard box and make two 6-inch squares with a 3-inch circle in the middle. Using the stylus will make it easier to cut the circle, but if you're not comfortable using the stylus, don't be afraid. Just cut an “X” in the middle and insert the string through it.
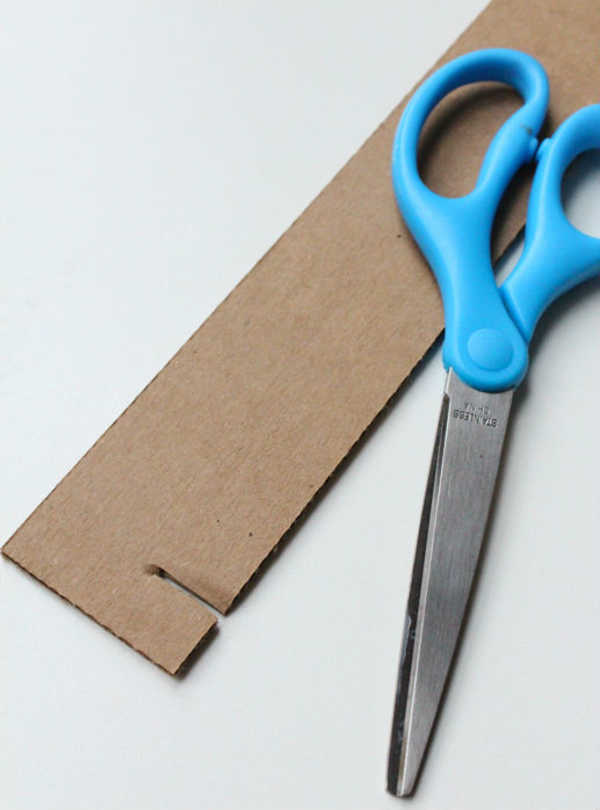
- Cut eight pieces of 4.45 x 24 cm to use as the sides of the light.
- Take each of the eight pieces, measure them, and mark them with a line 1.9 cm to 1.27 cm from the top of the piece, and the end of the side (on the same side). Then, with the help of scissors, cut a fine slit. This slit will serve as a socket for other pieces of the piece, so make sure they're big enough to fit the cardboard squares and nothing else. If they are bigger it won't stand firm and won't have support.
- To speed up the process, you can use the first piece as a base to mark the others.
- Place one of the squares on the table and begin to fit the other four corners. Then fit the top of the slits into the remaining square.
- Fill in the remaining four pieces of cardboard, keeping the space as even as possible.
- Paint your cardboard pieces and, as soon as they dry, insert the kit through the upper circle of the luminaire. Secure it by interlacing the safety circuit on the other side. This will keep the stand in place and make it strong and firm enough.
Images: Ashley Rose


Afterwards, just enjoy your lamp with a clear conscience!